

course. Courses are like people –
each course has its own personality.
You have to challenge each one as it
comes along” - Barbara Mizhrakie
The Course
The Course


Fast Facts
Fast Facts
Course Layout
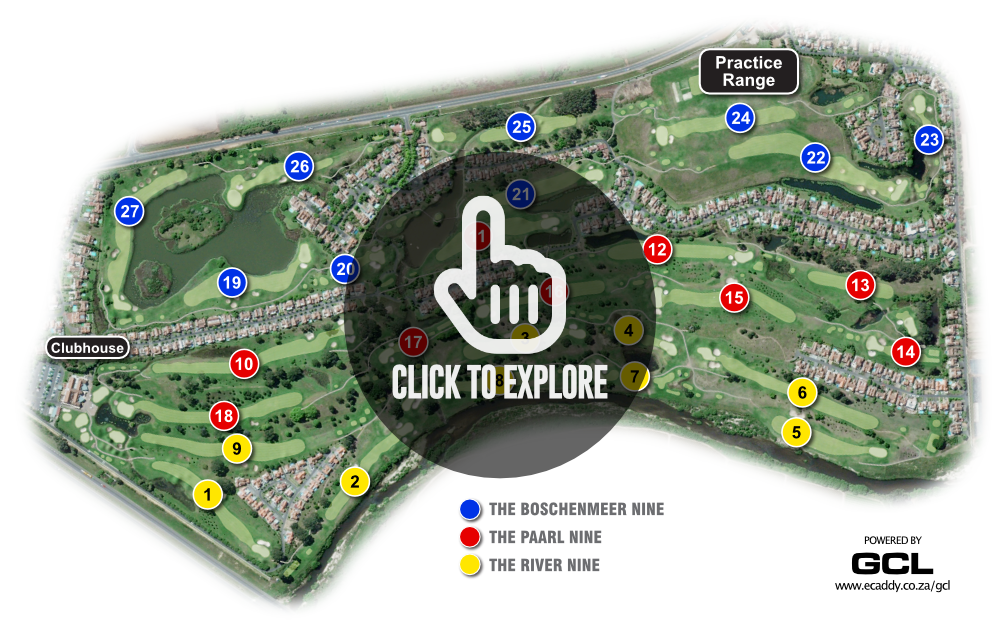
Course Layout


Hole 5
This par 4 will be testy with the wind blowing. The landing area for your drive is wider than it looks. When you reach the fairway take a moment to savour the tranquillity of the Berg River meandering so close to the fairway, there are no greenside bunkers, but an accurate approach is required to this narrow elongated green.
Hole 6
A narrow driving hole. A good drive will however be rewarded with the possibility to reach the green in two. The front entrance to the green is very narrow protected by two greenside bunkers. This makes running the ball up the green fairly risky. The back portion of this very long green is unsighted from the fairway and falls away at the back requiring accurate judgement with a back pin placement.


Hole 7
The green is wide left – right but very narrow front to back and will test your skill in stopping the ball with a long iron. When the pin placement is back right, the smart shot is to play for the middle of the green left but beware the bunker which will punish you if you take too little club.
Hole 8
Make sure to check the pin position on the green before you tee off and plan your drive accordingly. An iron off the tee to the right-hand side of the fairway will always be the smart play. The green lies diagonally to the left and is quite narrow. A deep greenside bunker guards the front of the green.


Hole 9
A tree lined par 5 has ample space for your drive. A good drive will put you in a position to reach the green in two. It will however take some guts as the green is well guarded by a creek and water on the right. The smart play is to lay up as close to the creek as possible and then attack the pin with a lofted club.
Hole 10
Accuracy off the tee is crucial as the water on the left comes into play off the tee and the right of the fairway is lined with pine trees. A precision drive with a slight fade is required. A good drive from the long hitters will make the green reachable in two. The two-tiered green is undulated and slopes back to front and left to right. Bunkers on each side of the green increase its need for accuracy.


Hole 11
A short par 4 with out of bounds on the right of the fairway. A good straight drive will leave you with a short wedge to this hole. An accurate shot is required into this green as water lurks on both sides of this narrow long green. Make sure you have enough club with a back pin placement. The two-tiered green slopes heavily back to front.
Hole 12
This is a long par 4, known as the monster, so give it all you have off the tee. Beware of water on the left side which will require a well struck accurate shot into this green. The green is well guarded by three bunkers, front, left and right. With a front pin position, it might be a good idea to lay up and go in with a lofted club. The green is fairly large with gentle undulations, sloping from left to right and back to front.


Hole 13
A short par 4 with a 90-degree dogleg to the right. Good course management is required on this hole. You need to get beyond the tall pine trees on the right to have a shot to the green. Anything shorter will mean you will have to shape your second shot around the trees. The green is narrow and long and falls away to the left in the centre. A water creek runs about 20 metres in front of the green.


Hole 15
Hit your driver with a slight draw, this will leave you with a shorter shot into the green. From the fairway this green appears extremely shallow but more often than not it will be difficult to stop a ball on the green with a long iron or fairway wood. Settle for the left side of the green if the pin is struck behind the bunker on the right.
Hole 16
Another par 4 that requires accuracy off the tee. Anything on the left side of the fairway brings the trees into play and will see you struggle to make par. The adventurous lower handicapper can hit a driver over the three bunkers on the right. This will leave you a very short chip into the green. The green slopes from back to front and left to right with bunkers left and right. Some very interesting undulations come into play when the pin is placed back left, and you would want to keep the ball beneath the hole.


Hole 18
This fairway is wide with the trees on the right in play for the longer hitters. The better golfer can take driver and aim to clear the left-hand fairway bunker with a slight fade. This will place you in the left-hand side of the fairway opening up the green for your second shot. Going for the green is not for the faint hearted. There is no room for error to the left with a greenside bunker perfectly positioned right of the green and a water hazard surrounding the front and left side of the green.


Hole 21
This par 4 is much tougher than it looks. The hole plays long especially with a south-easterly wind blowing. The fairway is guarded by fairway bunkers left and an obscured water hazard will catch long drives straying to the right. The green slopes significantly from back to front and is guarded by bunkers all around and water on the right. With a front pin placement, you definitely want to be below the hole for an uphill putt.
Hole 22
After your walk up the hill take some time to enjoy the splendour of the surrounding mountains while you catch your breath. In front of you lies a very scenic par5 that doglegs down the hill to the right, with water on either side of the fairway. The smart play is to hit your second shot short of the fairway bunker. This will take out all the trouble. The green is very wide but not very deep and you will be rewarded for it if your distance is correct.


Hole 23
A very demanding par 3 that will cost you shots in a blink of an eye. The green is elevated and well bunkered whilst water and out of bounds also comes into play. Missing this green on either side will see you struggle to make par. The safe option on this hole is always to the middle of the green. Par on this hole is a good score.
Hole 24
Another testy par 4 that plays short in summer, but long in winter. The views are breath taking and on a clear day you can see Table Mountain. Your drive is to a blind plateau with out of bounds in play on the right. The elevated green is difficult to hold especially in summer with the wind from behind.


Hole 25
Known as the best hole on the course it is a real test of skill for any golfer. The fairway is lined with pine trees on both sides with a creek that cuts across the fairway about 80m in front of the green. The elevated tee box gives a beautiful view of what lies ahead. There are no bunkers around the green, but the green itself makes up in difficulty.
Hole 26
A very scenic short par 4. Driver is definitely not the club on this hole. Your tee shot is from an elevated tee with water in play all along the left side of the fairway and rough to the right. The green is well surrounded with water, and anything missed left or long will almost certainly be wet. A very undulating green makes chipping and putting a challenge.

